Cmux
Okay, now if you have seen the previous video about Ghosty, then this should feel pretty familiar. But don't worry if you haven't because it's not required for this video. So essentially a terminal that I have been using for Claude Code and
other coding agents a lot recently is known as tmux. And you can see that, and you can see on the website it says that it's a terminal for coding agents and a terminal for multitasking. And you can
use like Claude Code, Codex CLI, Gemini CLI, and basically any other terminal commands inside of this. So it has a bunch of features like vertical tabs, notification rings, a in-app browser so
you don't have to go over to a separate browser. It allows for split panes just like Ghosty. It's scriptable, which I will be going into later in the video, and it's super lightweight as well. So it looks kind of like this,
and this can be a little bit overwhelming, but if we break it down, we can see that the person has two browser tabs open over here, and then they have like a browser pane open here with two more tabs.
They have a terminal session over here and then they have another one over here running Codex. And then they have another one here running Cloud Code. And then they have different workspaces on the left-hand side. So you can see they
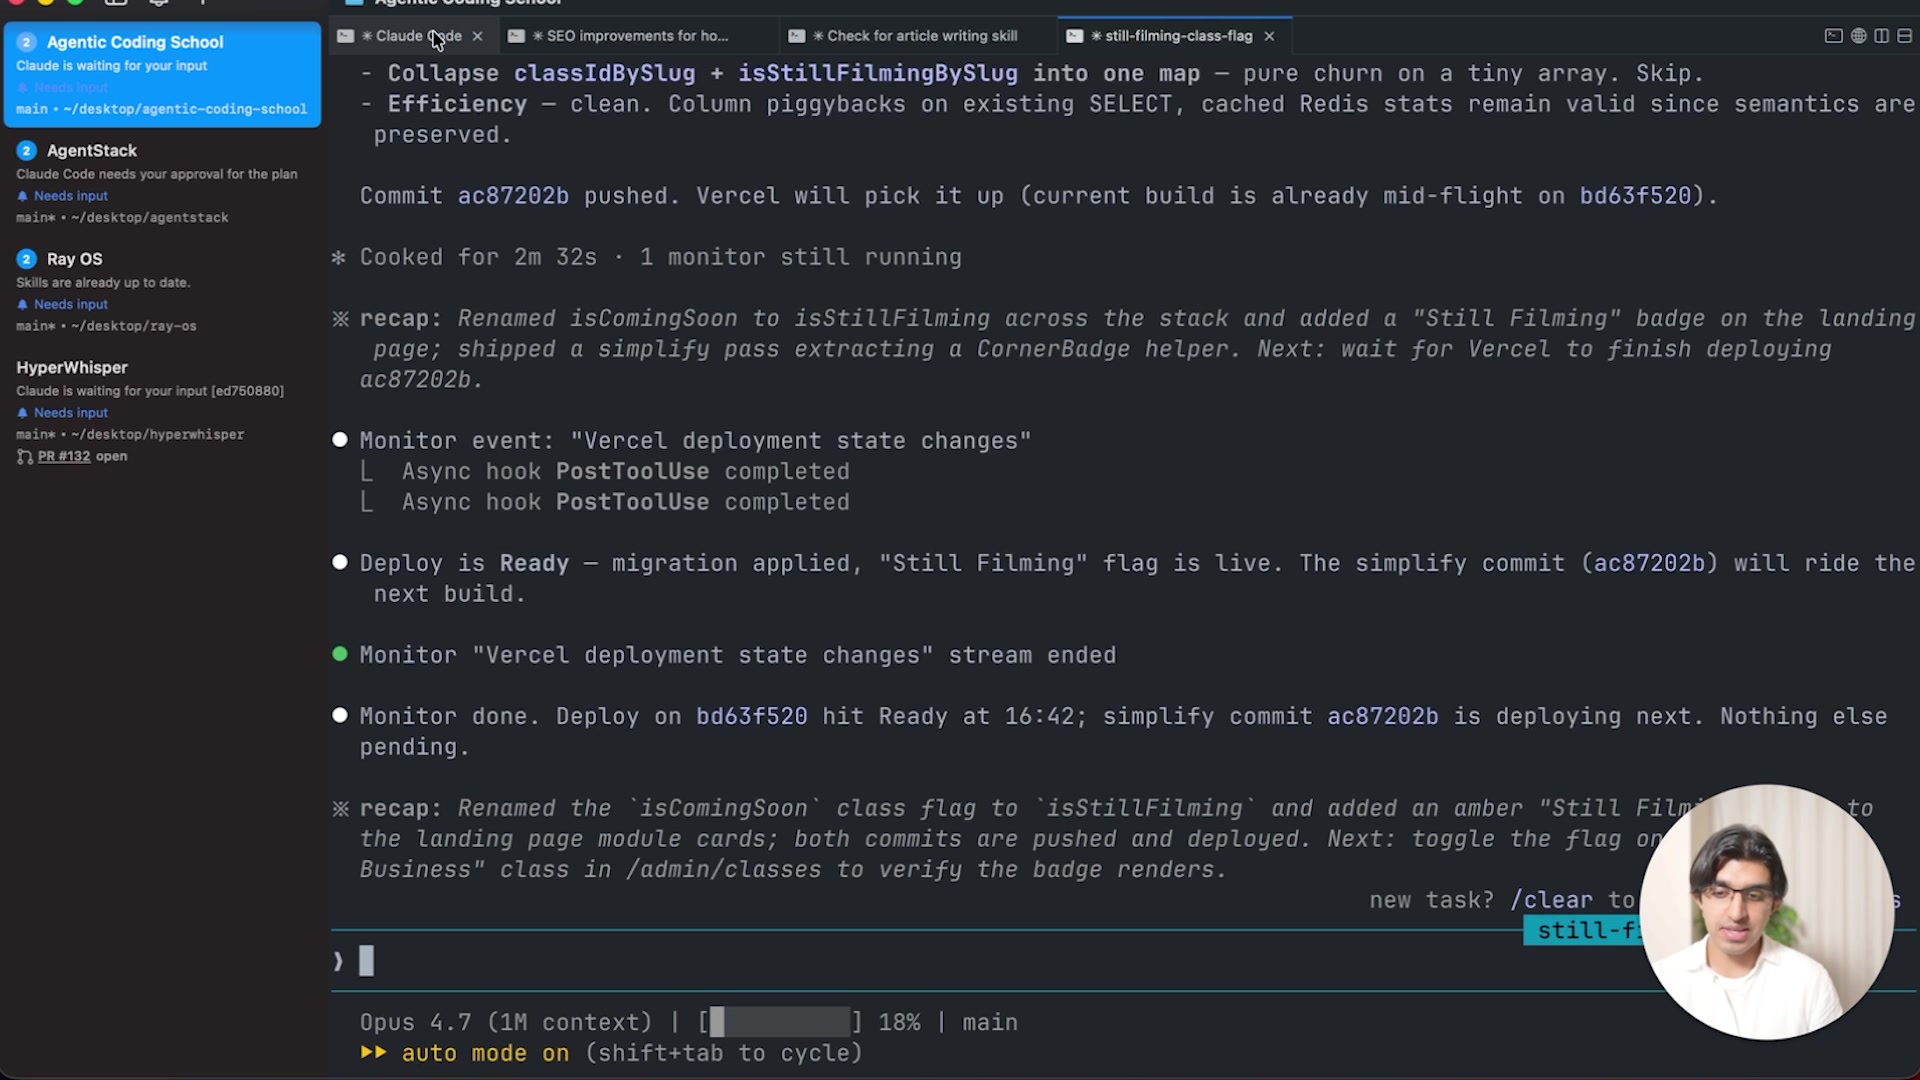
have a number of workspaces, some in the same folder and some in different folders. And you can see in my particular case, I have a bunch of tabs for different Cloud Code sessions that I have running, each with different names in
the titles. And then I have workspaces down on the left-hand side for all the different projects that I'm working on. So this can be really handy if you work on a lot of different projects because because with horizontal and
vertical tabs, you get a greater degree of organization. Now it does feel as fast as Ghosty because it is built on the same rendering engine and it is also free and open source to use. So essentially if you
go and download it for Mac, you can then download it onto your computer over here. Then opening it up, you would just drag and drop it into the applications folder. And then when you search and open up tmux, you should
see something kind of like this. So I will zoom in to make it a bit easier to see, But essentially you should be in your user directory folder. Okay, now during the video, I will be going through a lot of keyboard shortcuts
and you don't have to memorize them all because there will be a reference documentation from the tmux, like docs down below. So you can just have this open like on the side for the first couple of tmux
sessions that you do and just remember the keyboard shortcuts that you care the most about. So we can do a couple of things. Firstly, we can make brand new tabs. So if you press Command+T on your keyboard, then it will
open up a new tab, Command+T, another tab and so forth. So you can keep on doing that. And then of course pressing Command+W will then close those tabs. If you press Command+D, then it will split pane to the right. And that is
exactly just like Ghosty, if you have seen the video about Ghosty. And then if you press Command+Shift+D, it will split pane downwards, like over here, selecting this area, pressing Command+Shift+D, it will split
pane downwards. So we can see we have 4 panes here now, 1, 2, 3, 4. We can move our cursor, which is in pane number 1, across those panes by doing Option Command and then right.
And that will move our cursor to the right. Option Command left will move it back. Option Command down will move it down. And we can just move around with our arrow keys kind of like this. So now we are back to having
1 pane and I can open up another pane by doing Command D again. And now we can open up what is known as a surface. So if I do Command+T, then it will open up a surface over here.
So these are known as surfaces and I can open up surfaces here too. And surfaces are essentially tabs within side of a pane. And for example, on the left-hand side, I can move back and forth between surfaces by doing Command+Shift
and then left square bracket and then right square bracket to move back and forth between them. So essentially we have these four surfaces inside of a pane And then we have these two panes making up a workspace.
We can open up a brand new workspace by doing Command N to open up a new workspace and then do the same thing on there as well. Command N to open up another one and so forth. Now if we have a bunch of
workspaces, we can switch between them easily. Now you may want to start renaming these workspaces. They will already have a name kind of showing like which directory you're in. So if I went to my like folder over here, then it
will appear on the right-hand side, the name of the folder. But if I wanted to give it an actual name, I can do Command+Shift+R and then it will say Rename Workspace. So I can type in a name over here, press Enter,
and that will be the name of that workspace. I can repeat that again over here, Test 3, Test 2, Test 2, and then Test 1. But now instead of doing Command+Shift+R, you can rename a surface by
doing Command+R. So you can see currently my cursor is over here. If I do Command+R, it'll be, hey, enter tab name. So I can say, this is a tab. And then it says, this is a tab here.
Now one of the nice things is that if you run Claude Code in one of these sessions, so if I go to this one over here, run Claude, and then I rename the session by doing /rename, Claude will either
automatically generate a name depending on the conversation, but there's nothing in the conversation so far. If I do /rename and then said, adding feature X, for example, then in the top over here, it will then rename
the tab, the horizontal tab to adding feature X as well. Now one of the nice things is that when Claude Code is finished with a task, so if I said, can you tell me what this project is about?
And then if I turned off my do not disturb mode on my computer and then pressed enter, and let's say I switched over to another workspace for that time being, then I will get a notification in the top right saying that
Claude Code is done and needs my attention. So you can see that it appears right over here in the top right. Saying completed in AgentStack. If I clicked on that notification, I can see the previous ones. Clicking on that,
it will then take me over to that surface. And something else that you may have noticed is that if I said a Nova prompt and then I switched over, then you will see that it shows 1 in like a circle over here
to mean that this needs my attention. And then clicking on that workspace, it will then disappear because I'm now focused on it. So this can be really handy for knowing which sessions Claude Code has replied in. With workspaces,
we can do a bunch more things like right-clicking and then changing the color. We can also reorder them by dragging and dropping because you may want them to be in a specific order for your projects. If you press Command+I, then you can
see all the notifications that you have in the top left over here. And then I can click on any of these and it will take me back to the relevant surface. So you can see this is a previous session that I had
whereby I have one workspace for each of the projects that I'm in.. And then one tab, horizontal tab, also known as a surface inside of one big pane. So each of my workspaces has one big pane.
And then I have, now in tmux, we also have a browser and you can open that by pressing the browser button in the top right over here. And that will then open as a new tab. And then you can search normally by doing
like google.com. And then I can drag this to like be on the right-hand side. Then this will be in two panes. And I can continue to do that. So I can open up another tab over here, go to youtube.com,
open up another tab over here, and then I can like move this down here and go to x.com, for example. Now you may also want developer tools as well to kind of see what's happening. So you can press Option Command I,
and then you'll see the developer tools pop up right over here. But it's like kind of squished together because my screen is quite small that I'm recording on. So I could see console output, network requests, and more. Now if you have multiple
surfaces in the same pane open, kind of like I have it right now, the horizontal tabs, and then you have multiple workspaces, the vertical tabs. You can go back and forth easily by doing like Command
1. So you can see over here it says Command 1, 2, 3, 4, 5. If I press Command 1, then it will go back to Workspace 1. Then if I press Control, you can see it appears over here. Pressing Control
1, 2, 3, 4, I can go back and forth between those. Pressing Control, I can see Control 1, 2, 3, 4, I can go back and forth between them really quickly. But if you gave one
of your surfaces a particular name and then you want to go back to it, but you forgot where it was, then you can press Command+P, then it will show you all your workspaces and surfaces that you have. But since Claude Code automatically
renames your sessions as well, depending on what you're doing, you will be able to go back to the relevant one really quickly by going through the list and then pressing Enter, and then it will hop back to that particular surface. Okay, so I
know that was a lot of keyboard shortcuts and this will be linked down below so you can have this open on the side, uh, you're using cMux and then learn the ones that are most relevant to you. Now, one of the really interesting
things is that cMux also provides a CLI tool as well. So if you read through this page, then you can kind of see that cMux allows you to create a new workspace programmatically by using
CLI commands like cMux new workspace. So you could write that in like cMux new workspace and it would do that for you. Now what makes this powerful is the fact that you can get Claude Code to control cMux using the CLI
because Claude Code is quite good at using CLI. If I close everything over here, turned on bash mode by doing !cmux --help, that will then run it so Claude Code knows of
all these cmux commands. And then I'm gonna say 5 more workspaces and then also 5 surfaces in each workspace. And in each of those, can you then run the Claude command to start Claude Code? And then
pressing enter, Claude Code will then look through the help thing that we just put into its context window and then figure out how to use a CLI. To do exactly what I just said. So you can see it's opening up these
different terminals right now. It's appearing on the left-hand side. And then in each of them, and then for each of them, it will start a brand new like session. So you can see we have tons of tabs being opened right over
here. And then after that, it will run Claude in all of those tabs. So we will have like 25 sessions of Claude Code running all together. Okay, so I think it's now done because my computer's very laggy now. And if
I go to any of these, you can see tons of sessions of Claude Code are running, uh, altogether. So we have like 25 sessions of Claude Code running. So let me close these workspaces. And the reason this
is interesting is because Claude Code will soon add the ability for Claude Code to see which other sessions of Claude Code are running within the same folder. Now it's quite interesting to read through the tmux CLI to see everything that
it's capable of. But one thing that I would want to point out right over here is the tmux notify. So So if you want to take advantage of the notification system in cmux, then you can run this command with a
hook, for example. So cmux will by default let you know when Claude Code is done because with a stop hook, it will let you know when it's done. But you may want to add or set up other hooks that cmux will then
notify you of. Now, one thing that you may be aware of is that when you have agent teams running in Claude Code, then you can chat with each individual team member. Now, cmux, also supports this because if you run
tmux cloud-teams, then it will set up the right instance of Cloud Code to take advantage of this. So for example, let's say I close out of Cloud Code, then run the command tmux cloud-teams, press enter. So let
me do that right over here. tmux cloud-teams, press enter. It will then put in the right things into Cloud Code so it's aware of the tmux team system, of how to use the terminal properly, so we
can communicate with each individual subagent. So I'm going to now say, can you make a demo team with 5 team members to show how the agent team feature works? So it started exploring the codebase,
but I specifically said the word subagent teams and then it started doing it properly. So you can see it automatically opened a brand new session for me. I did not do that. And now it's running that team member. It will then
open up another one. And like my hands off the keyboard, it's just opening up these brand new terminals. And this is all built into cMux automatically. So it's kind of like having tmux running on your machine because tmux
also supports Paint, but this is cMux instead. So of course I can communicate with any of the team members by saying like, hello over here. And ideally I would have this on a bigger screen instead because it is quite crowded,
but I can move these around by like moving this over here, moving this here as well. And then like have a different setup for this particular agent team. So yeah, that is pretty much everything that I wanted to cover with CMOX.
It is pretty like detailed and there are a lot of things that I haven't covered. So I would recommend reading through the documentation, but that should give you a good baseline for you to be able to work across multiple projects with
multiple sessions of Claude Code and other coding CLI tools quite easily.